In this age of multimedia presentations and home entertainment, projectors have become an essential tool for magnifying images and videos, isn’t it? Whether you’re delivering a presentation at work or enjoying a movie night at home, the size of the projected screen can greatly enhance the experience.
In this article, we’ll explore various methods and tips on how to enlarge screen on a projector, ensuring that your visuals command attention and immerse your audience in the content.
Why You Need To Enlarge Screen On A Projector?
If you’ve ever used a projector for presentations, movie nights, or any kind of visual content, then you may need to enlarge the screen for better visibility. Yes, enlarging the screen on a projector can significantly improve the viewing experience, making the content more engaging and easier to comprehend.
It does not matter that you’re in a conference room, classroom, or home theater, these techniques can make a noticeable difference overall in your viewing experience.
Choosing the Right Projector
Selecting a projector with suitable lumens and resolution is the foundation for a larger screen experience. Higher lumens ensure brighter images, while higher resolution guarantees sharpness.

Resolution Matters
Exploring Resolution Options
Resolution determines the clarity of the projected image. Common options include HD (High Definition), Full HD, and 4K. The higher the resolution, the sharper the visuals.
Best Resolution for Your Needs
For a home theater setup, 4K resolution offers cinematic experiences, while HD may suffice for presentations. Match the resolution to your intended use for optimal results.
Brightness and Lumens
Importance of Brightness
Brightness is measured in lumens and impacts the projector’s visibility in various lighting conditions. Higher lumens are ideal for well-lit spaces.
Finding the Right Lumens
Consider the environment where you’ll use the projector. Home theaters can have lower lumens, while business presentations may require higher brightness.
Contrast Ratio Clarity

Unveiling Contrast Ratios
The contrast ratio means the difference between the brightest and darkest parts of an image. You can know more about contrast ratio here.
Impact on Image Quality
A high contrast ratio leads to better image depth and detail. For movie buffs and gamers, this translates to more immersive experiences.
Throw Distance and Screen Size
Calculating Throw Distance
The distance between the projector and the screen affects image size and clarity. Different projectors have varying throw distances.
Ideal Screen Size for Your Space
Consider your room dimensions. A larger screen may require a longer throw distance, while smaller spaces might benefit from short-throw projectors.
Keystone Correction and Lens Shift
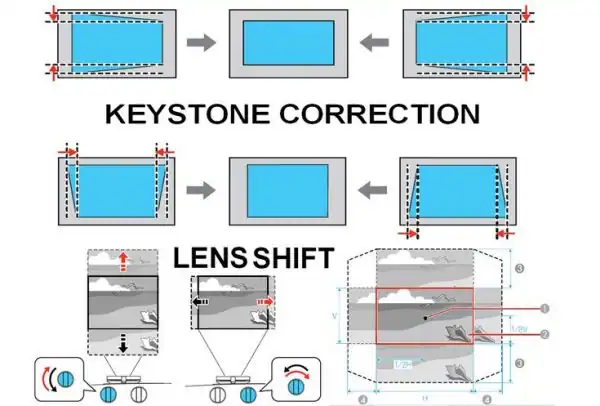
Correcting Image Distortion
Keystone correction rectifies the trapezoidal distortion that can occur when a projector isn’t positioned straight.
Lens Shift for Flexibility
Some projectors feature lens shift, allowing you to adjust the image without physically moving the projector.
Understanding the Basics of Projector Setup
When it comes to enlarging the screen on a projector, a solid understanding of the basics is crucial. Firstly, ensure that you have the right type of connections for your device.
Most projectors support HDMI, VGA, and USB connections. Choose a high-quality cable for optimal performance.
Additionally, select the right projection surface – a smooth, flat, and light-colored wall or a proper projection screen works best.
Related: Projector Ports: What Are The Ports Available In A Projector?
How To Enlarge Screen On A Projector?
Below are the steps to achieve a larger projected image:
Adjusting Projection Distance
The distance between the projector and the screen greatly influences the size of the displayed image. Refer to your projector’s user manual to determine the ideal projection distance for the desired screen size.
If the projected image appears distorted due to the angle, use the keystone correction feature to rectify it.
Adjusting Zoom and Focus
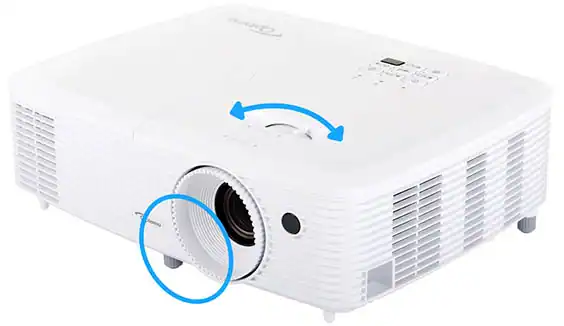
Projectors come equipped with either optical zoom or digital zoom. Optical zoom maintains image quality by adjusting the lens, while digital zoom enlarges the image but may compromise clarity. Experiment with both types to find the best balance for your needs.
Adjust the zoom to expand or shrink the image, then fine-tune the focus for a clear picture. It might take some trial and error to get it just right, but the result is worth it.
Screen Adjustments
Adjusting the screen ratio to match the projector’s native aspect ratio prevents distortion. You can also choose between portrait and landscape orientations based on your content. Some projectors offer manual adjustments, while others have automatic features.
Screen Selection
Consider the type of screen you’re using. A screen with a reflective surface can enhance brightness and enlarge the perceived image.
Top 7 Premium Quality Projector Screens:
Utilizing External Devices
For larger screen projection, consider connecting laptops or computers to the projector. Many projectors support screen mirroring from smartphones, allowing you to enlarge mobile content effortlessly.
Calibrating Display Settings

Access the projector menu to fine-tune display settings such as brightness, saturation, and gamma. These adjustments can significantly impact image size and quality.
Ensuring Adequate Lighting
Ambient light can affect the perceived image size. Dim the lights or use the projector in a room with controlled lighting for the best results. In low-light conditions, the projected image can appear larger and more vivid.
Wall Color Consideration
The color of the wall where the projection is displayed can affect the image. A neutral, light-colored wall is ideal, as it provides a clear canvas for the projected content. Avoid bright or dark-colored walls that can distort the image.
How to make EPSON Projector screen bigger?
Here are the steps to make your EPSON projector screen bigger:

- Zoom Feature: Most EPSON projectors come with a zoom feature that allows you to adjust the screen size without moving the projector itself. Navigate the projector settings to find the zoom option and adjust it accordingly.
- Projection Distance: If your EPSON projector has an adjustable projection distance, move it further away from the screen to achieve a larger image size.
- Screen Aspect Ratio: Choose the appropriate aspect ratio for your content. EPSON projectors offer various aspect ratio options that can impact the size of the projected image.
- Keystone Correction: Ensure the projector is properly aligned with the screen. Keystone correction settings can help adjust the shape of the image to avoid distortion.
- External Devices: Connect external devices like laptops or media players to the projector. Adjust the output settings on the external device to match the desired screen size.
Remember to balance screen size with image quality to ensure a clear and enjoyable viewing experience.
How to Enlarge Screen on a Projector: Troubleshooting
If your projected image is too large for the screen, adjust the projector’s zoom or distance settings. In case of distorted projections, double-check the aspect ratio and keystone correction.
How to Enlarge Screen on a Projector: Maintenance & Care
Keep your projector and its components clean and well-maintained. Dust and dirt can accumulate over time and affect image quality. Regularly clean the lens and other parts to ensure optimal performance.
You May Also Like:
- Learn How To Mount A Projector To A Drop Ceiling!
- Learn How To Properly Remove And Clean A Projector Filter!
- How To Clean A Projector Screen (Top Secrets Revealed!)
- Best Mini Projector For iPhone (Pick Of This Year)
- Best Cheap Projector For PowerPoint Presentations
How To Enlarge Screen On A Projector: FAQs

Can I enlarge the screen without compromising image quality?
Yes, by adjusting resolution settings and using higher-quality source material, you can enlarge the screen while maintaining image clarity.
What is keystone correction?
Keystone correction is a feature that helps correct distorted images caused by the projector’s angle, contributing to better screen enlargement.
Is keystone correction essential for screen enlargement?
Keystone correction helps maintain image proportions, making it important for a uniform and accurate enlargement.
Can I use the zoom function excessively?
While the zoom function can enlarge the screen, excessive use might result in pixelation or reduced image quality.
How do I know the optimal projection distance?
Consult the projector’s manual for recommended projection distances based on the desired screen size.
Is wireless screen mirroring better than using cables?
Wireless screen mirroring offers convenience, but using cables can provide a more stable connection for screen enlargement.
The Bottom Line
In this article, we’ve walked you through the step-by-step process for how to enlarge Screen on a Projector, ensuring that you make the most of your projection setup.
Therefore, by understanding the basics of setup, adjusting projection distance and zoom, optimizing image quality, and exploring advanced options, you can create larger-than-life visuals for presentations, entertainment, and more. Thanks For Reading!
As an experienced Software Engineer in a Projection-Based Technology Company, I love sharing my Knowledge to utilize and help others to learn more about Projectors. Thus one can get the right Projector for their needs.